seawind8888


  • Home

  • Archives

koa2+mongo实现小程序同步登陆入库(附轮子)

Posted on 2019-07-19

近期业务用到微信登陆并同步mongo数据库,但目前微信官方只给了wafer2-quickstart-nodejs这个koa2+mysql方案,google+git也并没有找到轮子或方案,就自己写了个轮子(附小程序demo)
地址:https://github.com/seawind8888/weapp-node-mongo-scaffold

同步流程

微信官方文档只给了微信登录流程图,但并没有给出同步数据库登录的流程。并且各种openId、sessionKey、iv等相关的鉴权字段也是搞得人很懵逼,按照自己轮流程做了个图,供参考
image

效果实现

先启动项目

  1. 使用微信开发者工具导入项目目录下example项目,并填入自己申请的AppID

  2. 进入项目,关闭详情 - 不校验合法域名
    image

  3. 点击微信同步登陆,提示用户入库成功,并返回session_key和token(可存入storage并加入请求header)
    image

  4. mongo入库用户信息成功
    image

    Tips: 客户端调用wx.login生成token,实际有两个鉴权逻辑(微信鉴权,客户端交互token鉴权),客户端可先使用wx.checkSession判断微信鉴权,再获取客户端鉴权

同步实现逻辑

1
2
3
4
5
6
7
8
9
10
11
12
13
14
15
16
17
18
19
20
21
22
23
24
25
26
27
28
29
30
31
32
33
34
35
36
37
38
39
40
41
42
43
44
45
46
47
48
49
50
51
52
53
54
55
56
57
58
59
60
61
62
63
64
65
66
67
68
69
70
71
72
73
74
75
76
77
78
79
80
81
82
83
84
85
86
87
88
89
90
91
92
93
94
95
96
97
98
99
100
101
102
103
104
105
loginAction = async (ctx) => { 
// 调用/user/login
const {
encryptedData,
code,
iv
} = ctx.query
const {
AppID,
AppSecret
} = config.weapp
// 开始获取openId && session_key
const resultData = await this.getAppId({
appid: AppID,
secret: AppSecret,
code: code
});
// 解密微信签名,获取用户信息
const decode = new WXBizDataCrypt(AppID, resultData.session_key)
const userInfo = decode.decryptData(encryptedData, iv)

// 引入小程序用户的model
const WeChatUser = mongoose.model('User');

// 查询用户信息
await WeChatUser.findOne({
openid: resultData.openid
})
.exec()
.then(async result => {

// 设置token格式
const userToken = {
openid: resultData.openid
}
if (!result) {
// 首次登录生成token, 有效期为24小时​
const token = jwt.sign(userToken, secret, {
expiresIn: 60 * 60 * 24
})
const NewWechatUser = new WeChatUser({
// 用户信息入库
avatar: userInfo.avatarUrl,
nickName: userInfo.nickName,
openid: resultData.openid,
token: token
});
try {
const _save = await NewWechatUser.save()
console.log('[mongoSave]', _save)
//成功返回code=200,并返回成sessionKey
ctx.body = {
statusCode: 200,
message: '登录成功, 用户信息入库成功',
Token: token,
sessionKey: resultData.session_key
};
} catch (error) { //失败返回code=500,并返回错误信息
console.log('[tokenSave]', error)
ctx.body = {
statusCode: 500,
message: '参数错误',
data: error
}
}

} else { // 已添加token
const token = result.token
try {
// token校验
await jwt.verify(token, secret)
ctx.body = {
statusCode: 200,
message: '登录成功,用户已入库',
Token: token,
sessionKey: resultData.session_key
};
} catch (err) {
if (err && err.name == 'TokenExpiredError') {
// token失效
const token = jwt.sign(userToken, secret, {
expiresIn: 60 * 60 * 24
})
// 更新token

const _update = WeChatUser.updateOne(secret, token)
console.log('[mongoUpdate]', _update)
ctx.body = {
statusCode: 200,
message: '登录成功,Token更新成功',
Token: token,
sessionKey: resultData.session_key
};
} else {
console.log('[tokenVerify]', error)
ctx.body = {
statusCode: 500,
message: '服务器内部错误',
data: error
}
};
}
}
});
}

next.js - window is not defind 解决方法

Posted on 2019-07-15

使用next.js在引入其他组件或者模块可能会出现报错

1
2
ReferenceError: window is not defined
...

解决方法

使用next动态引入模块或组件

1
2
3
4
5
import <模块名> from 'next/dynamic';
const Module = dynamic(
import('<模块名>'),
{ ssr: false }
);

使用模块或组件

1
<Module>

or

1
Module()

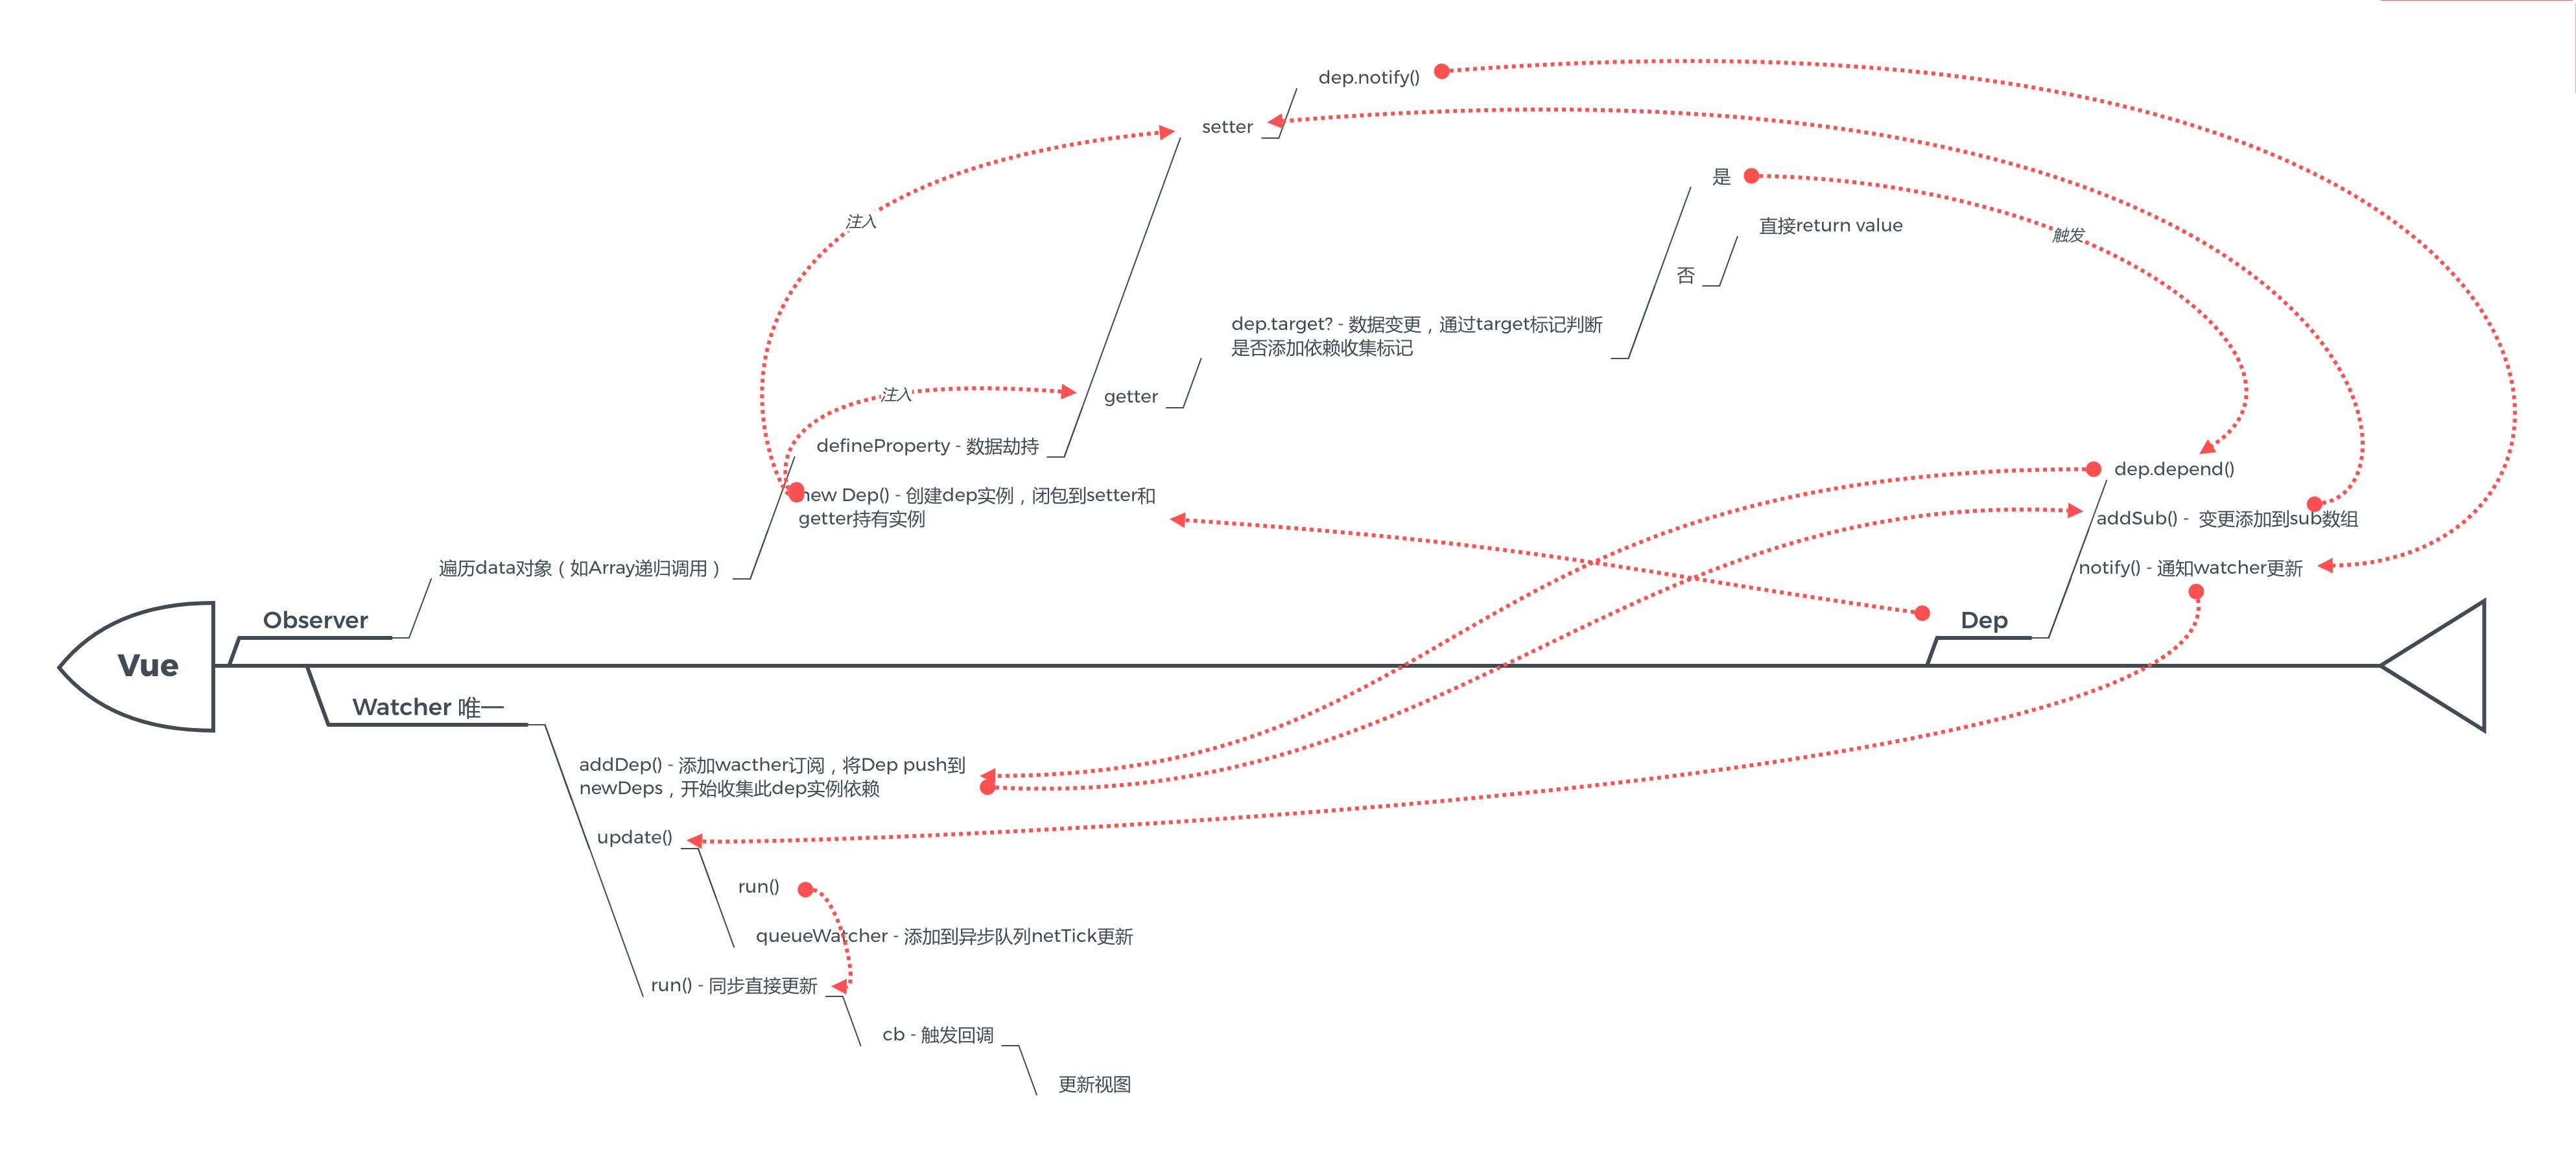
一图看懂Vue数据绑定原理

Posted on 2019-07-15

image

babel7搭建node es6环境

Posted on 2019-07-15

1. 安装依赖

1
npm i --save-dev @babel/core @babel/register @babel/plugin-proposal-class-properties @babel/plugin-transform-async-to-generator @babel/plugin-transform-modules-commonjs

2. 配置.babelrc文件

1
2
3
4
5
6
7
{
"plugins": [
"@babel/plugin-transform-async-to-generator",
"@babel/plugin-transform-modules-commonjs",
"@babel/plugin-proposal-class-properties"
]
}

3. 写入口文件index.js

1
2
require('@babel/register');
require('./app') // 要运行的文件

4. 启动

1
node index.js
附git demo地址

https://github.com/seawind8888/node-babel7-es6

seawind8888

4 posts
10 tags
© 2019 seawind8888
Powered by Hexo
|
Theme — NexT.Muse v5.1.4